Kubernetes - Kubeflow for Poets
When a microservice application is deployed in production, it usually has many running containers that need to be allocated the right amount of resources in response to user demands. Also, there is a need to ensure that the containers are online, running and are communicating with one another. The need to efficiently manage and coordinate clusters of containerized applications gave rise to Kubernetes.
Kubernetes is a software system that addresses the concerns of deploying, scaling and monitoring containers. Hence, it is called a container orchestrator. Examples of other container orchestrators in the wild are Docker Swarm, Mesos Marathon and Hashicorp Nomad.
Kubernetes was built and released by Google as an open-source software, which is now managed by the Cloud Native Computing Foundation (CNCF). Google Cloud Platform offers a managed Kubernetes services called Google Kubernetes Engine (GKE). Amazon Elastic Container Service for Kubernetes (EKS) also provides a managed Kubernetes service.
Features of Kubernetes
- Horizontal auto-scaling: dynamically scales containers based on resource demands.
- Self-healing: re-provisions failed nodes in response to health checks.
- Load balancing: efficiently distributes requests between containers in a pod.
- Rollbacks and updates: easily update or revert to a previous container deployment without causing application downtime.
- DNS service discovery: Uses Domain Name System (DNS) to manage container groups as a Kubernetes service.
Components of Kubernetes
The main components of the Kubernetes engine are the:
- Master node(s): manages the Kubernetes cluster. They may be more than one master node in High Availability mode for fault-tolerance purposes. In this case, only one is the master, and the others follow.
- Worker node(s): machine(s) that runs containerized applications that are scheduled as pod(s).
The illustration below provides an overview of the Kubernetes architecture. Later, we'll briefly go through the individual sub-components.
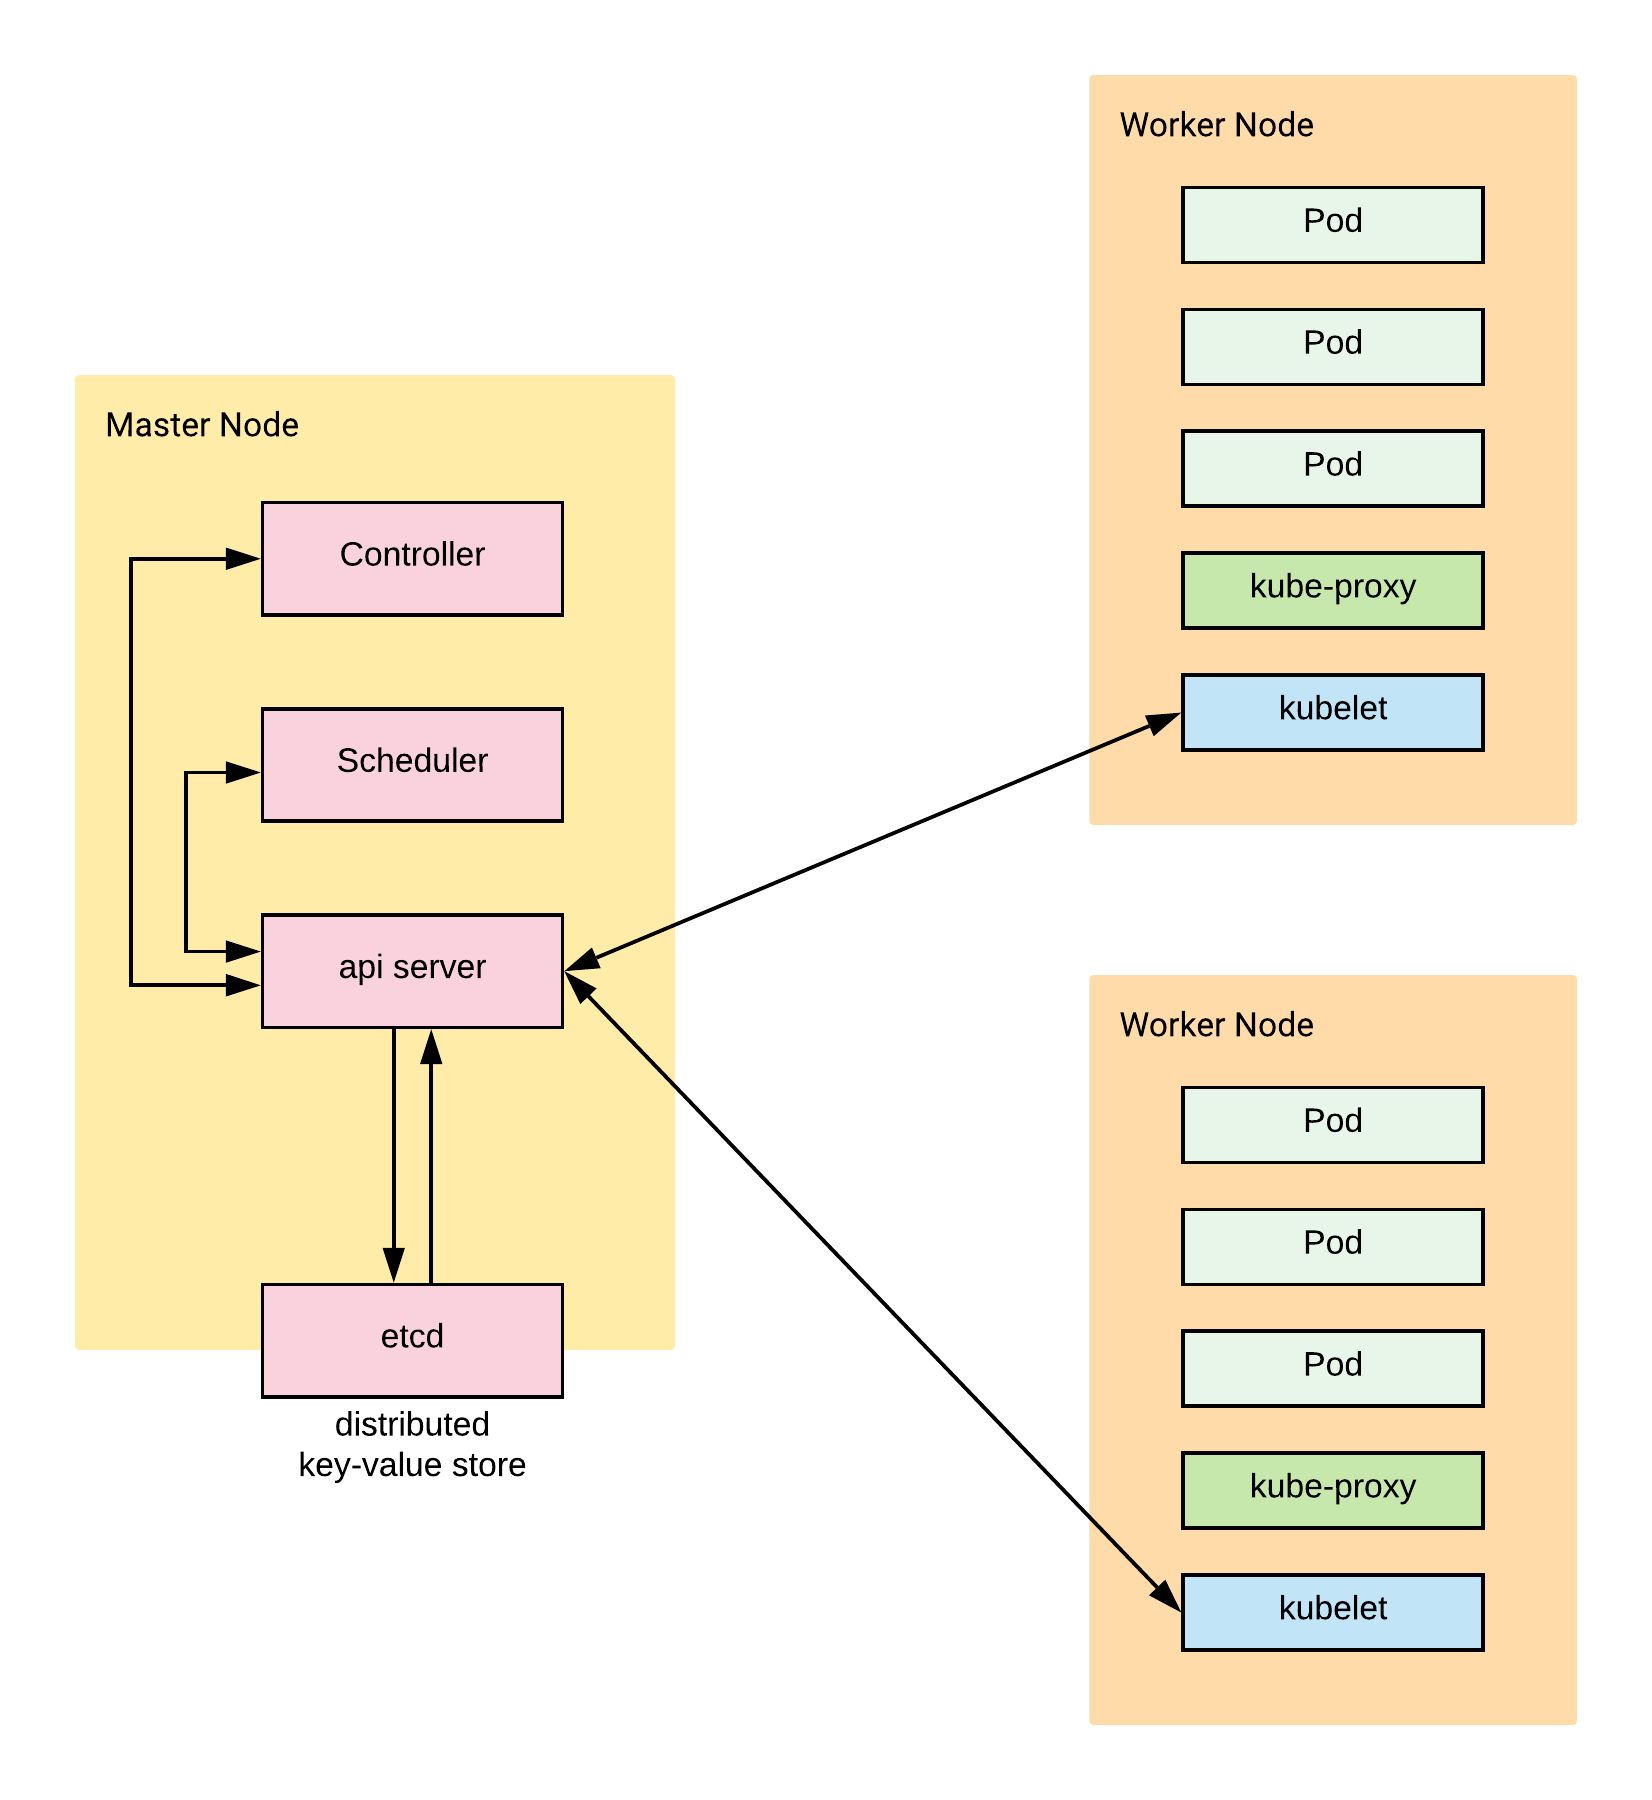
Master Node(s)
- etcd (distributed key-store): manages the Kubernetes cluster state. This distributed key-store can be a part of the Master node or external to it. Nevertheless, all master nodes connect to it.
- api server: manages all administrative tasks. The
api serverreceives commands from the user (kubectlcli,REST or GUI), these commands are executed and the new cluster state is stored in the distributed key-store. - scheduler: schedules work to worker nodes by allocating pods. It is responsible for resource allocation.
- controller: ensure that the desired state of the Kubernetes cluster is maintained. The desired state is what is contained in a JSON or YAML deployment file.
Worker Node(s)
- kubelet: the
kubeletagent runs on each worker node. It connects the worker node to theapi serveron the master node and received instructions from it. Ensures the pods on the node are healthy. - kube-proxy: it is the Kubernetes network proxy that runs on each worker node. It listens to the
api serverand forward requests to the appropriate pod. Important for load-balancing. - pod(s): consists of one or more containers that share network and storage resources as well as container runtime instructions. Pods are the smallest deployable unit in Kubernetes.
Writing a Kubernetes Deployment File
The Kubernetes deployment file defines the desired state for the various Kubernetes objects. Examples of Kubernetes objects are:
- Pods: a collection of one or more containers.
- ReplicaSets: part of the
controllerin the master node. Specifies the number of replicas of a pod that should be running at any given time. It ensures that the specified number of pods is maintained in the cluster. - Deployments: automatically creates
ReplicaSets. It is also part of thecontrollerin the master node. Ensures that the clusters current state matches the desired state. - Namespaces: partition the cluster into sub-clusters to organize users into groups.
- Service: a logical group of Pods with a policy to access them.
- ServiceTypes: specifies the type of Service e.g.
ClusterIP,NodePort,LoadBalancer,ExternalName. As an example,LoadBalancerexposes the service externally using a cloud provider’s load balancer.
- ServiceTypes: specifies the type of Service e.g.
Other important tags in writing a Kubernetes Deployment File.
- spec: describes the desired state of the cluster.
- metadata: contains information of the object.
- labels: used to specify attributes of objects as key-value pairs.
- selector: used to select a subset of objects based on their label values.
The deployment file is specified as a yaml file.
The example in the next sections deploys the nginx server image that was pushed to Dockerhub in the previous section to a Kubernetes cluster. The image is accessible at https://hub.docker.com/r/ekababisong/ebisong-nginx-server.
Example of a Service Object
This code snippet of a Service object is saved in kubernetes-intro/deployment.yaml.
yamlkind: Service apiVersion: v1 metadata: name: nginx-server-service spec: # service applies to the application with name `nginx-server` selector: app: nginx-server ports: - protocol: "TCP" # port inside cluster port: 8080 # forward to port inside the pod targetPort: 80 # accessible outside cluster nodePort: 30001 # load balance between 5 instances of the container application type: LoadBalancer
Example of a Deployment Object
This code snippet of a Deployment object is saved in kubernetes-intro/deployment.yaml.
yamlapiVersion: extensions/v1beta1 kind: Deployment metadata: name: nginx-server-deployment spec: replicas: 5 template: metadata: labels: app: nginx-server spec: containers: - name: nginx-server image: ekababisong/ebisong-nginx-server ports: - containerPort: 80
Running Kubernetes on Local Machine with Minikube
Minikube makes it easy to install and run a single-node Kubernetes cluster on a local machine. Go to https://kubernetes.io/docs/tasks/tools/install-minikube/ for instructions on installing Minikube.
- Install a hypervisor e.g. VirtualBox.
- Install Kubernetes Command line interface
kubectl. For mac:
bashbrew install kubernetes-cli
Check the installed version:
bashkubectl version
- Install Minikube. For mac:
bashbrew cask install minikube
Overview of Minikube commands
| Command | Description |
|---|---|
minikube status |
Check if Minikube is running. |
minikube start |
Create local kubernetes cluster. |
minikube stop |
Stop a running local kubernetes cluster. |
minikube dashboard |
Open Minikube GUI for interacting with the Kubernetes cluster. Append & to open in background mode minikube dashboard &. |
minikube ip |
get ip address of Kubernetes cluster. |
Overview of kubectl commands
| Command | Description |
|---|---|
kubectl get all |
list all resources. |
kubectl get pods |
list pods. |
kubectl get service |
list services. |
kubectl get deployments --all-namespaces |
list deployments for all namespaces. |
kubectl create -f [DEPLOYMENT_FILE.yaml] |
create a new resource based on the desired state in the yaml file. |
kubectl apply -f [DEPLOYMENT_FILE.yaml] |
if the resource already exists, refresh the resource based on the yaml file. |
kubectl delete -f [DEPLOYMENT_FILE.yaml] |
remove all resources from the yaml file. |
kubectl get nodes |
get the nodes of the Kubernetes cluster. |
kubectl delete deployment [DEPLOYMENT_NAME] |
delete the deployment with [DEPLOYMENT_NAME]. |
kubectl delete svc [SERVICE_NAME] |
delete the service with [SERVICE_NAME]. |
kubectl delete pod [POD_NAME] |
delete the pod with [POD_NAME]. |
Deploying Kubernetes on a local machine with Minikube Using kubectl
bash# create local kubernetes cluster minikube start
textStarting local Kubernetes v1.13.2 cluster... Starting VM... Getting VM IP address... Moving files into cluster... Setting up certs... Connecting to cluster... Setting up kubeconfig... Stopping extra container runtimes... Machine exists, restarting cluster components... Verifying kubelet health ... Verifying apiserver health .... Kubectl is now configured to use the cluster. Loading cached images from config file. Everything looks great. Please enjoy minikube!
bash# navigate to the directory with deployment file cd kubernetes-intro/ # create a new resource from yaml file kubectl create -f deployment.yaml
textservice "nginx-server-service" created deployment.extensions "nginx-server-deployment" created
bash# launch minikube dashboard minikube dashboard
textVerifying dashboard health ... Launching proxy ... Verifying proxy health ... Opening http://127.0.0.1:54356/api/v1/namespaces/kube-system/services/http:kubernetes-dashboard:/proxy/ in your default browser...
bash# list pods kubectl get pods
textNAME READY STATUS RESTARTS AGE nginx-server-deployment-f878d8679-5ptlc 1/1 Running 0 10m nginx-server-deployment-f878d8679-6gk26 1/1 Running 0 10m nginx-server-deployment-f878d8679-9hdhh 1/1 Running 0 10m nginx-server-deployment-f878d8679-pfm27 1/1 Running 0 10m nginx-server-deployment-f878d8679-rnmhw 1/1 Running 0 10m
bash# get ip address of kubernetes cluster $ minikube ip
text192.168.99.102
Running Webpage on pod orchestrated by Kubernetes
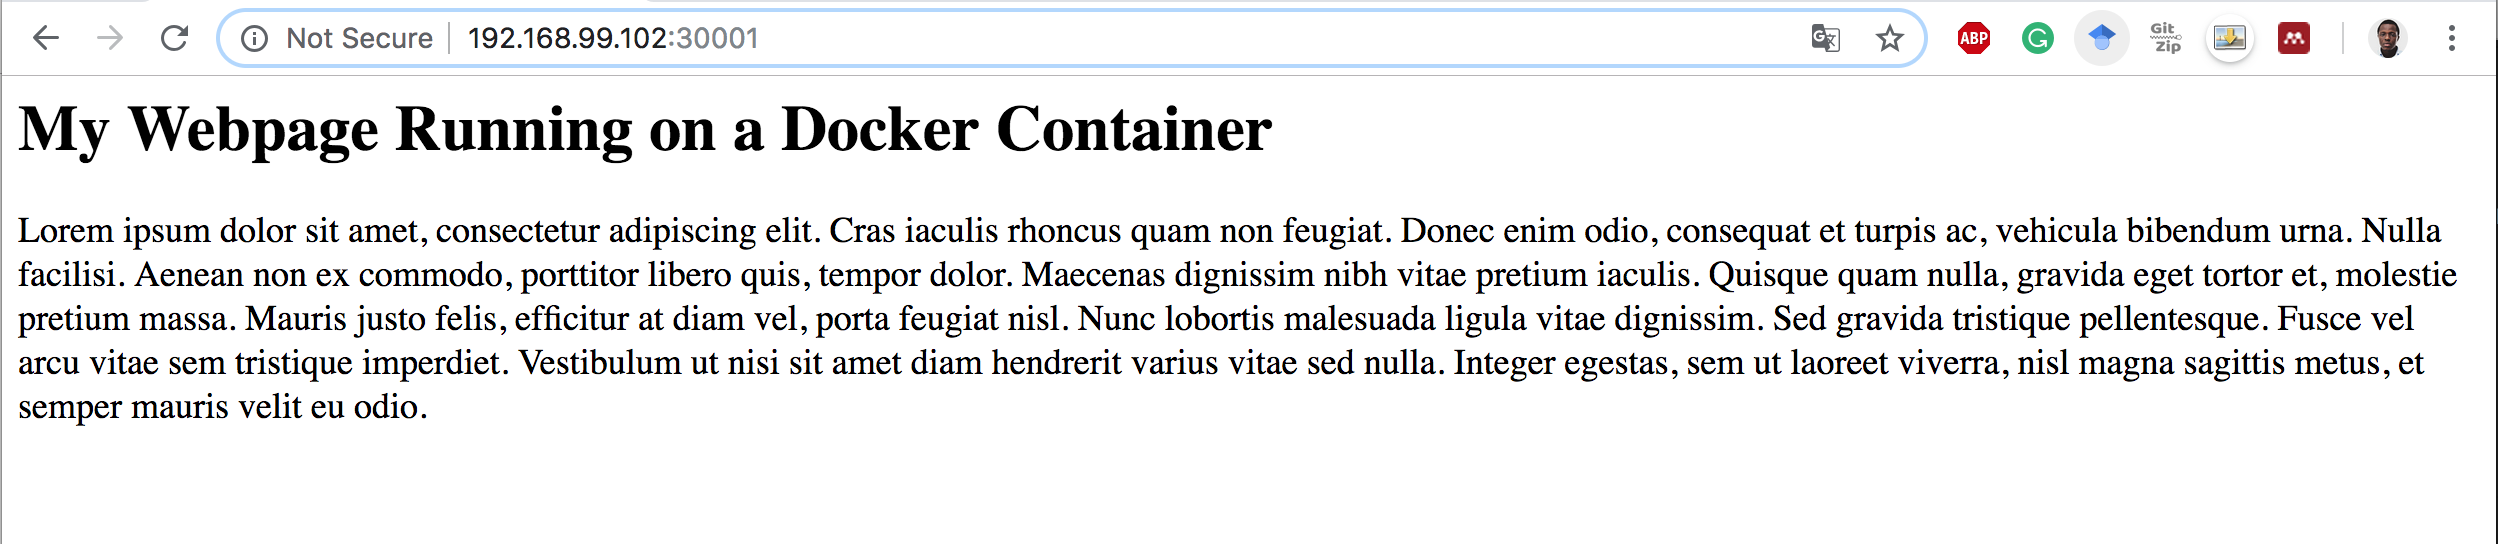
Let's access the application inside the Kubernetes cluster by running 192.168.99.102:30001. We use the port 30001 because we are accessing the application from outside the cluster.
Delete the Deployment and Stop Minikube
bash# delete the deployment kubectl delete -f deployment.yaml
textservice "nginx-server-service" deleted deployment.extensions "nginx-server-deployment" deleted
bash# stop minikube minikube stop
textStopping local Kubernetes cluster... Machine stopped.
Deploying Kubernetes on Google Kubernetes Engine
To create and deploy resources on GCP from the local shell, the Google Command line SDK gcloud will have to be installed and configured. If this is not the case on your machine, follow the instructions at https://cloud.google.com/sdk/gcloud/. Otherwise, a simpler option is to use the Google Cloud Shell which already has gcloud and kubectl (the Kubernetes Command line interface) installed.
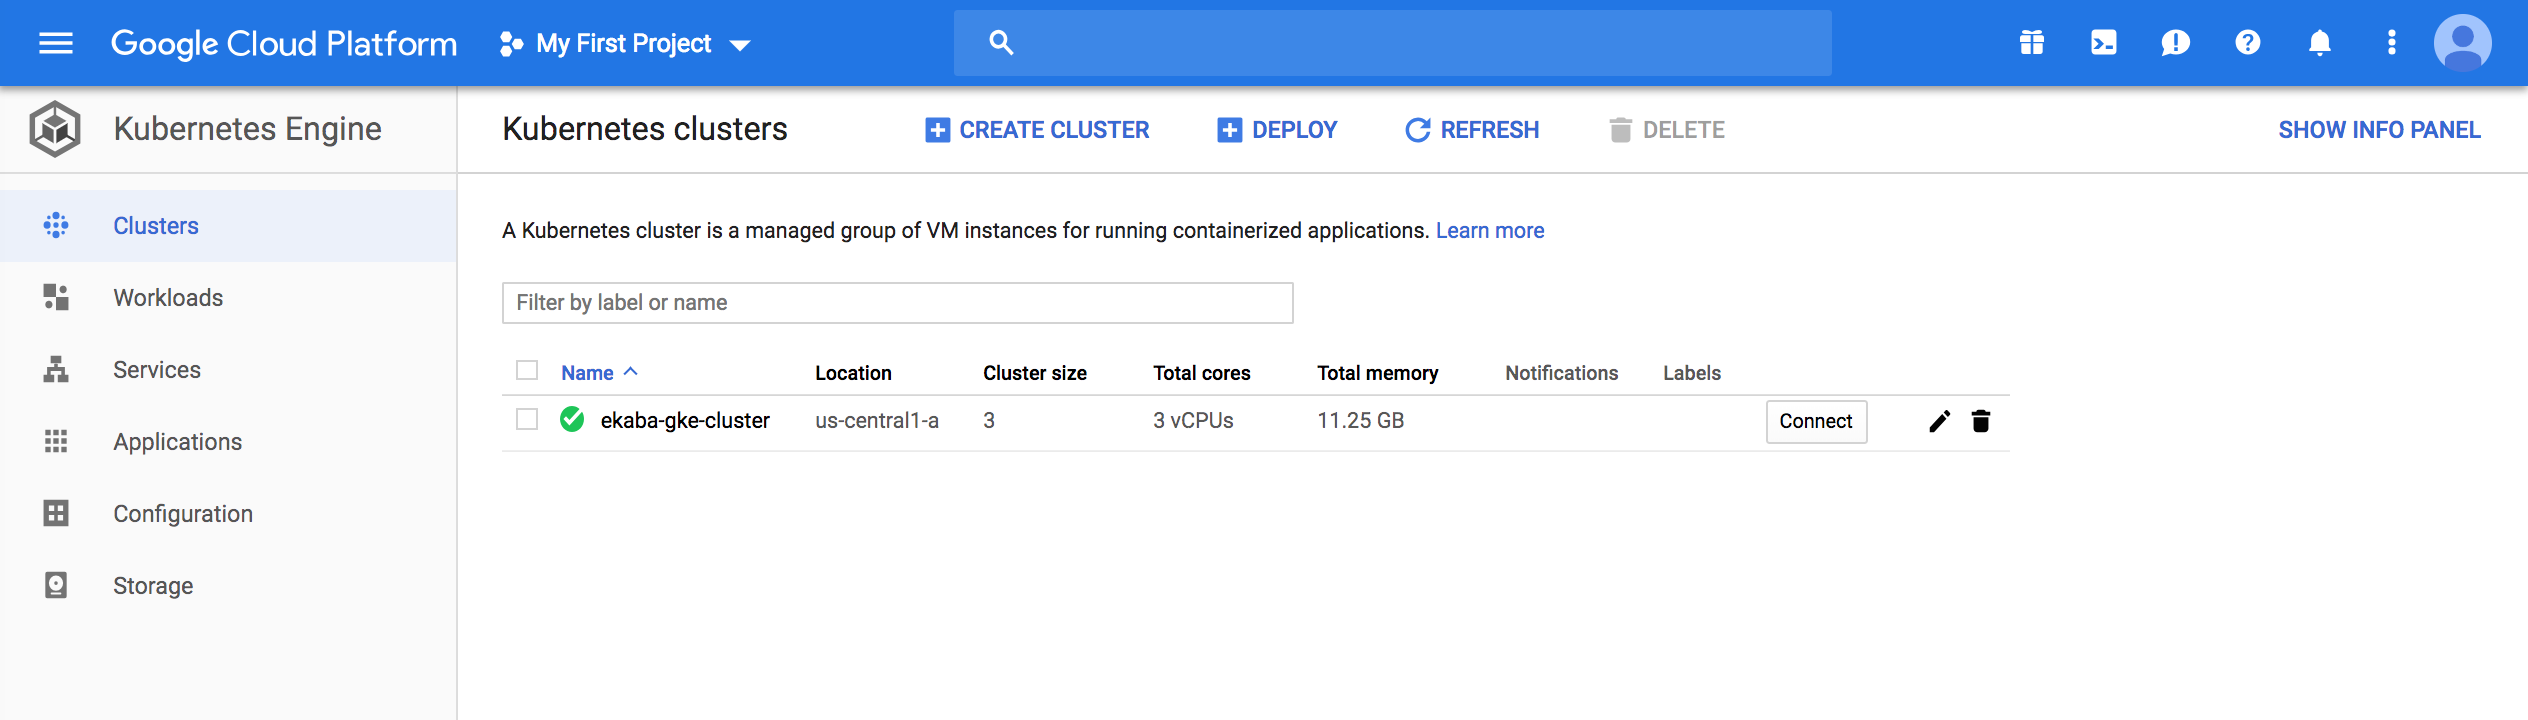
Creating a GKE Cluster
bash# create a GKE cluster gcloud container clusters create ekaba-gke-cluster
A Kubernetes cluster is created on GCP with 3 nodes (as default).
textCreating cluster ekaba-gke-cluster in us-central1-a... Cluster is being deployed...done. Created [https://container.googleapis.com/v1/projects/oceanic-sky-230504/zones/us-central1-a/clusters/ekaba-gke-cluster]. To inspect the contents of your cluster, go to: https://console.cloud.google.com/kubernetes/workload_/gcloud/us-central1-a/ekaba-gke-cluster?project=oceanic-sky-230504 kubeconfig entry generated for ekaba-gke-cluster. NAME LOCATION MASTER_VERSION MASTER_IP MACHINE_TYPE NODE_VERSION NUM_NODES STATUS ekaba-gke-cluster us-central1-a 1.11.7-gke.4 35.226.72.40 n1-standard-1 1.11.7-gke.4 3 RUNNING
To learn more about creating clusters with Google Kubernetes Engine, visit https://cloud.google.com/kubernetes-engine/docs/how-to/creating-a-cluster.
bash# get the nodes of the kubernetes cluster on GKE kubectl get nodes
textNAME STATUS ROLES AGE VERSION gke-ekaba-gke-cluster-default-pool-e28c64e0-8fk1 Ready <none> 45m v1.11.7-gke.4 gke-ekaba-gke-cluster-default-pool-e28c64e0-fmck Ready <none> 45m v1.11.7-gke.4 gke-ekaba-gke-cluster-default-pool-e28c64e0-zzz1 Ready <none> 45m v1.11.7-gke.4
Deploy an Nginx Web Server on GKE
bash# navigate to directory with deployment file cd kubernetes-intro/ # create new resource from yaml file kubectl create -f deployment.yaml
textservice "nginx-server-service" created deployment.extensions "nginx-server-deployment" created
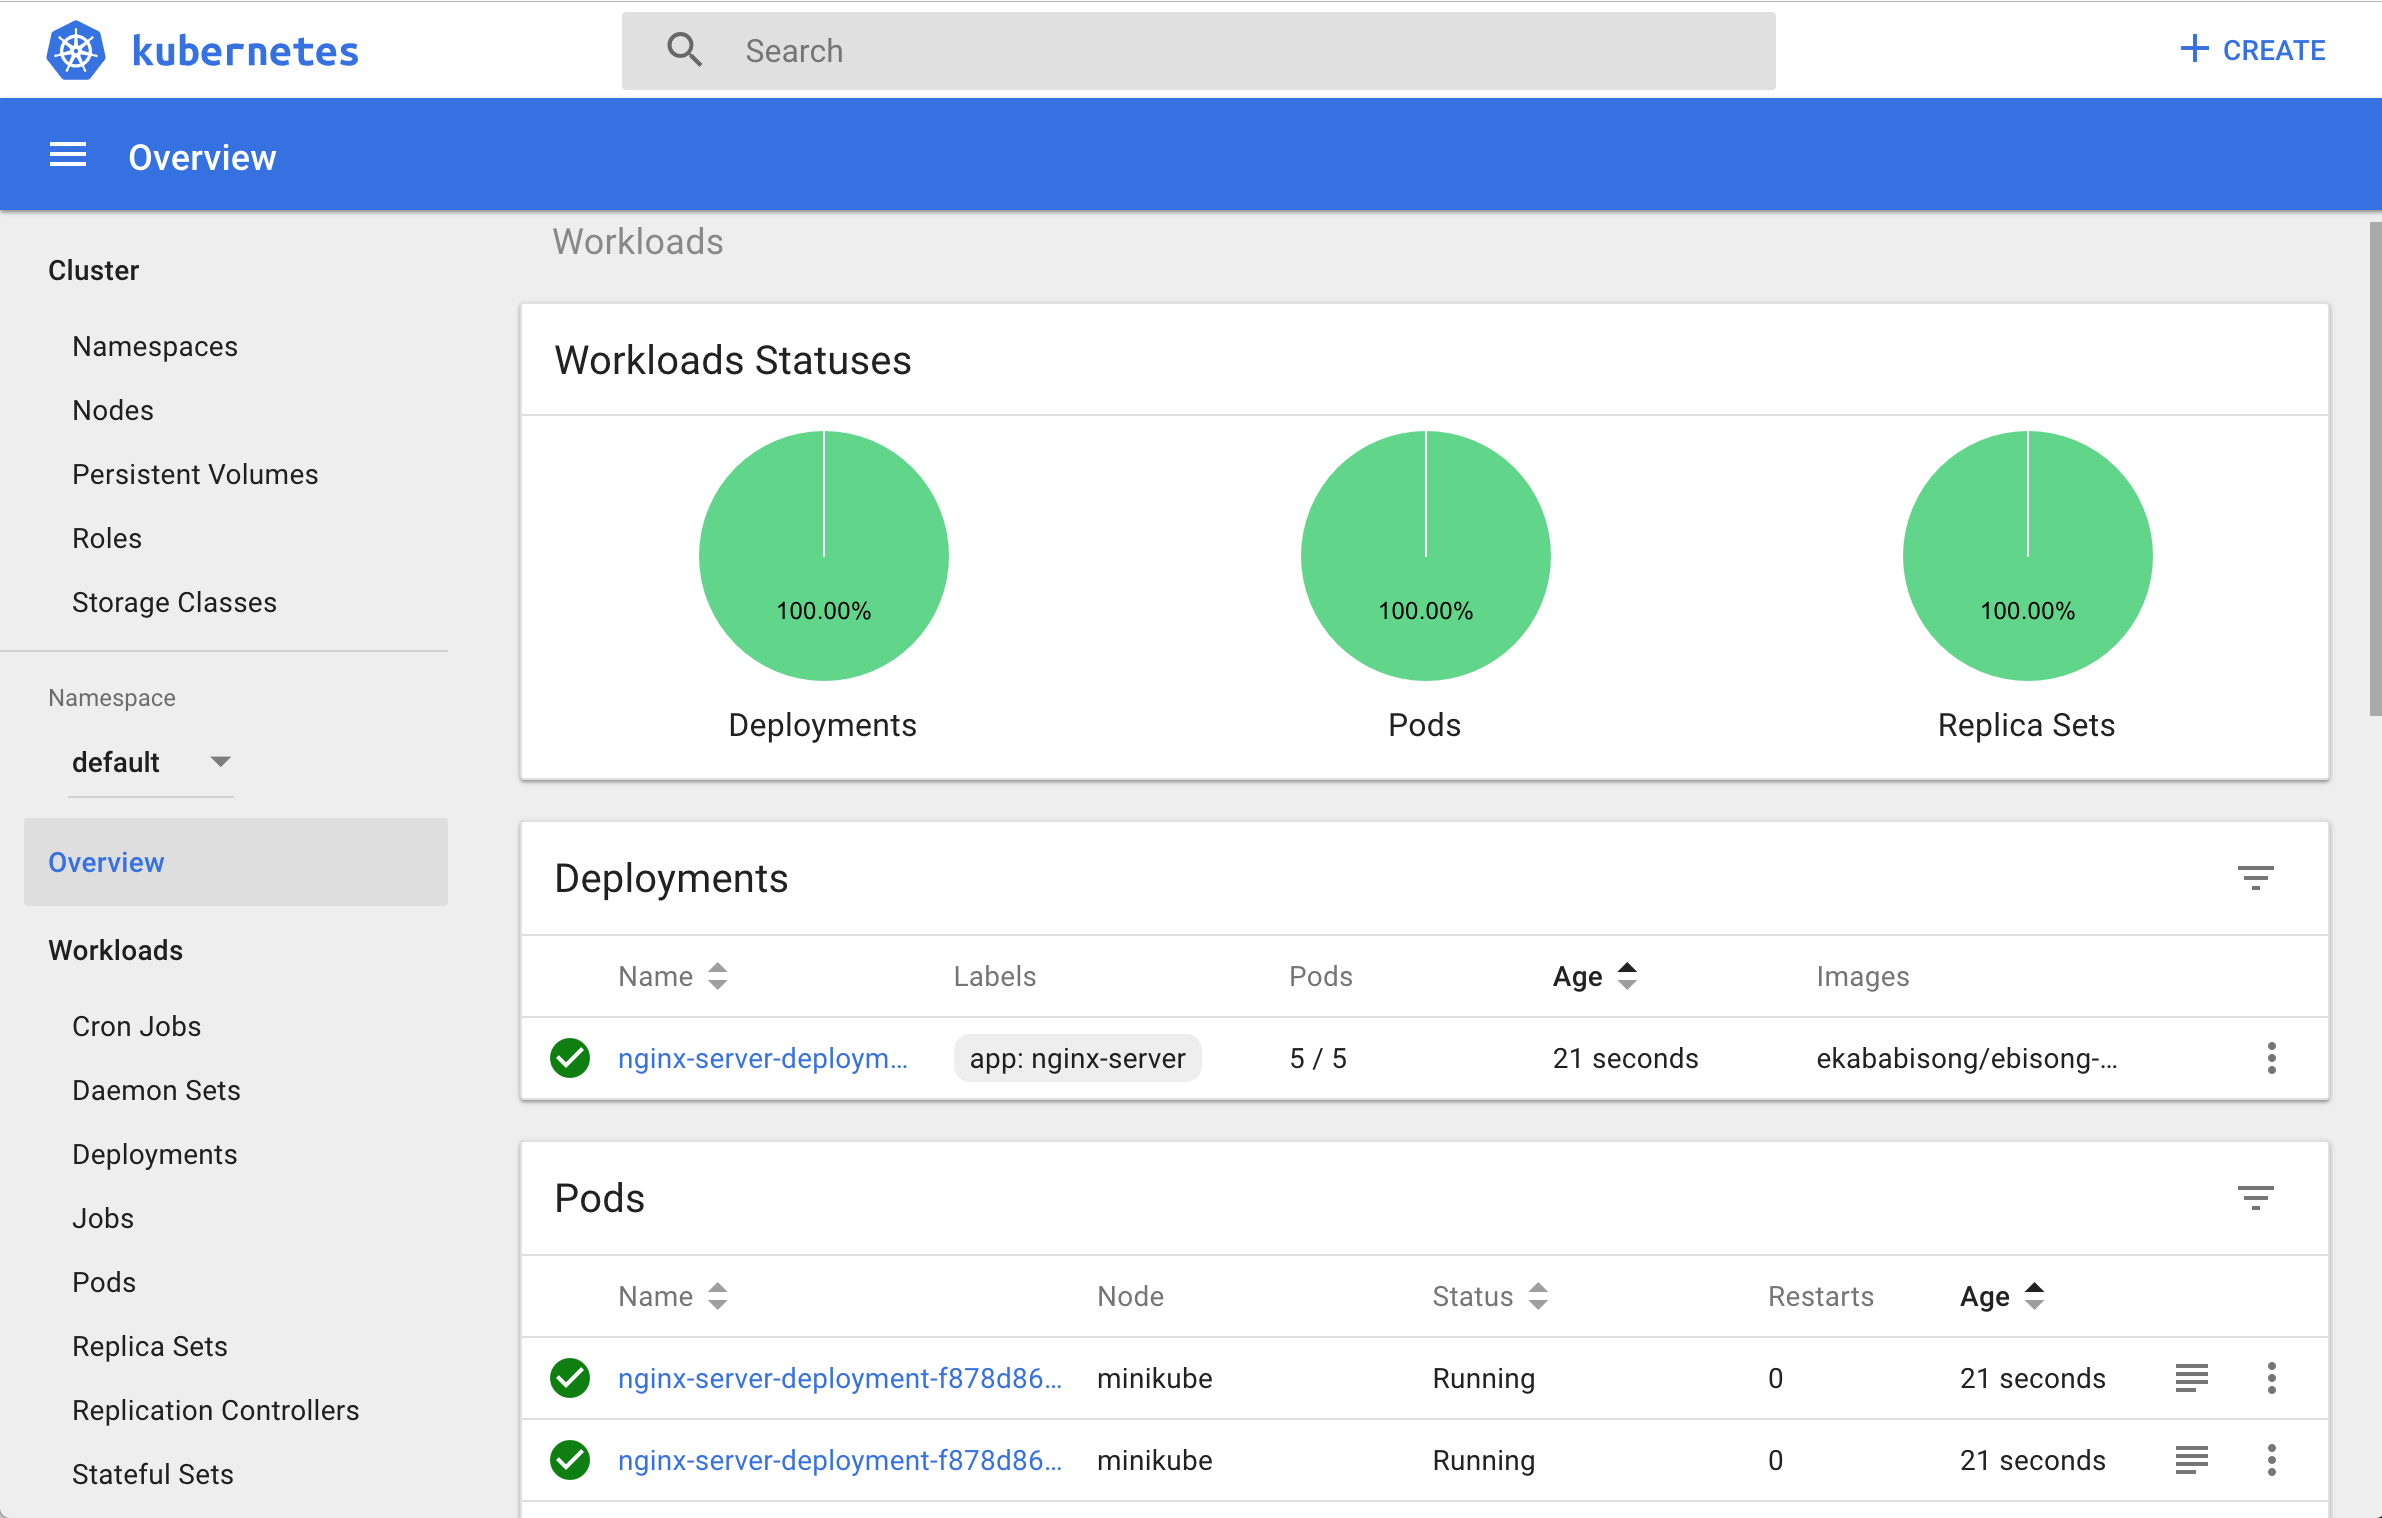
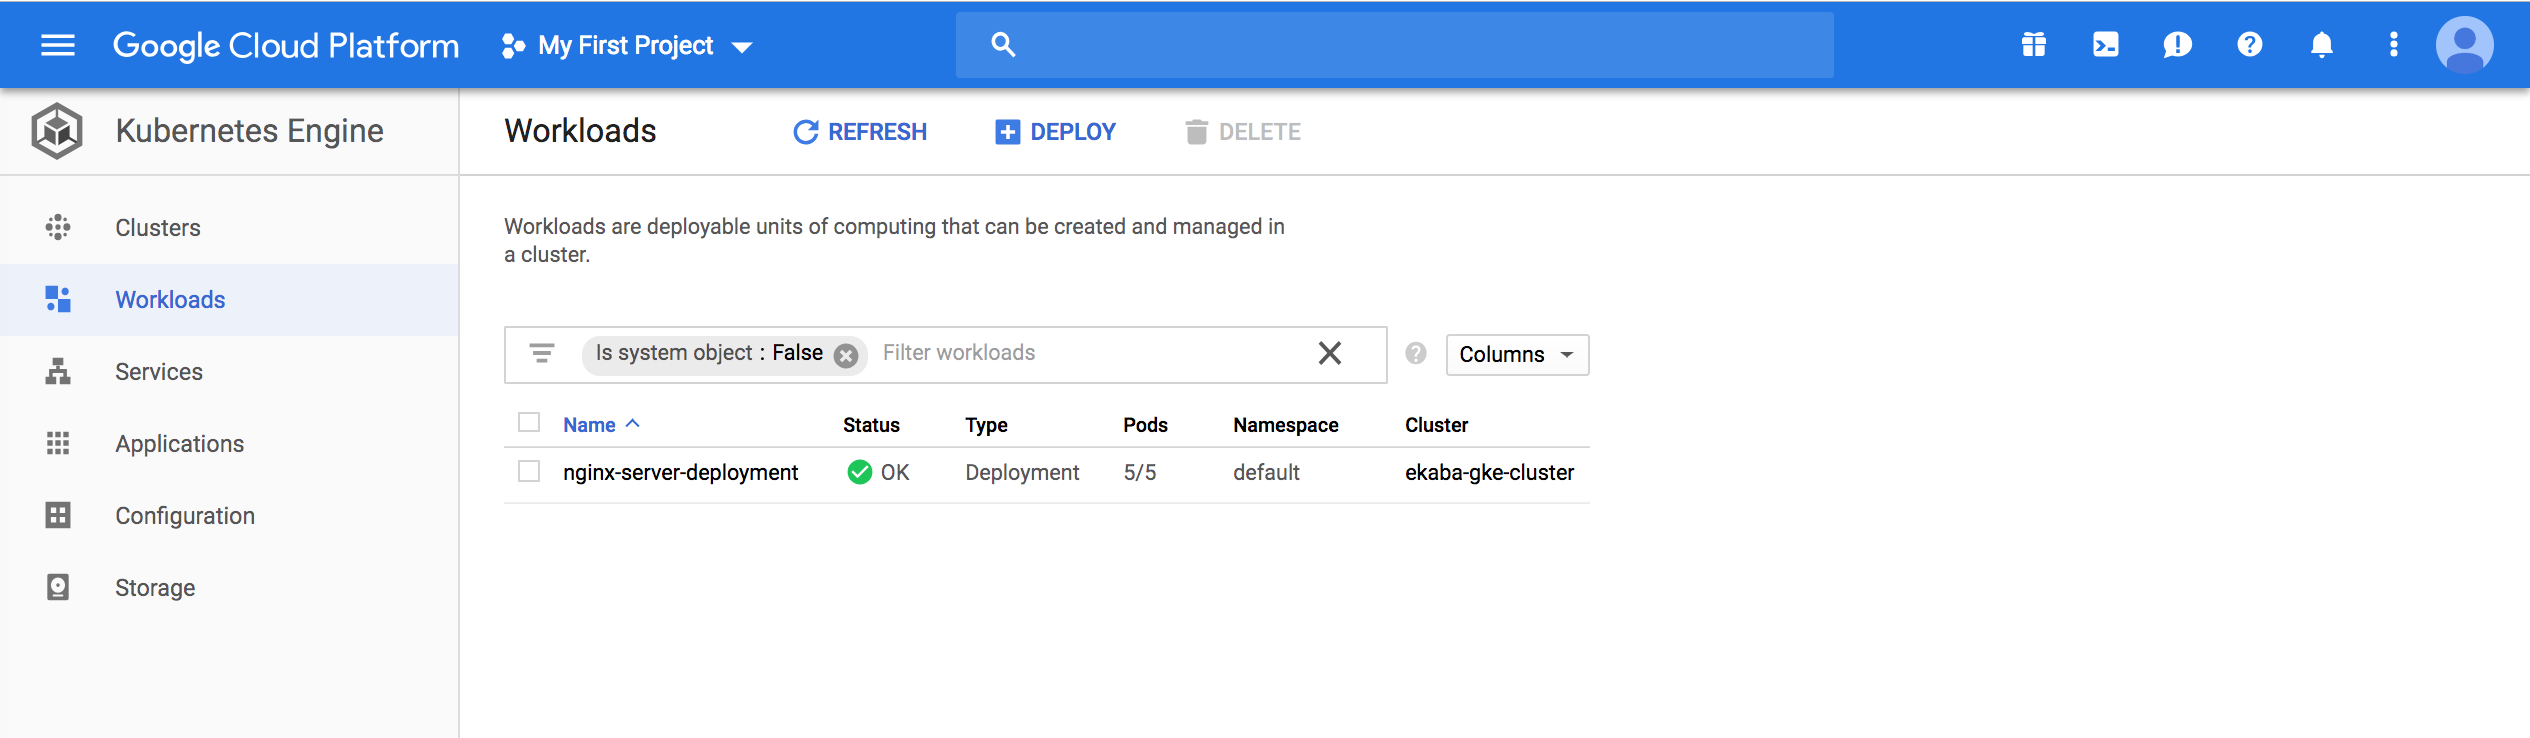
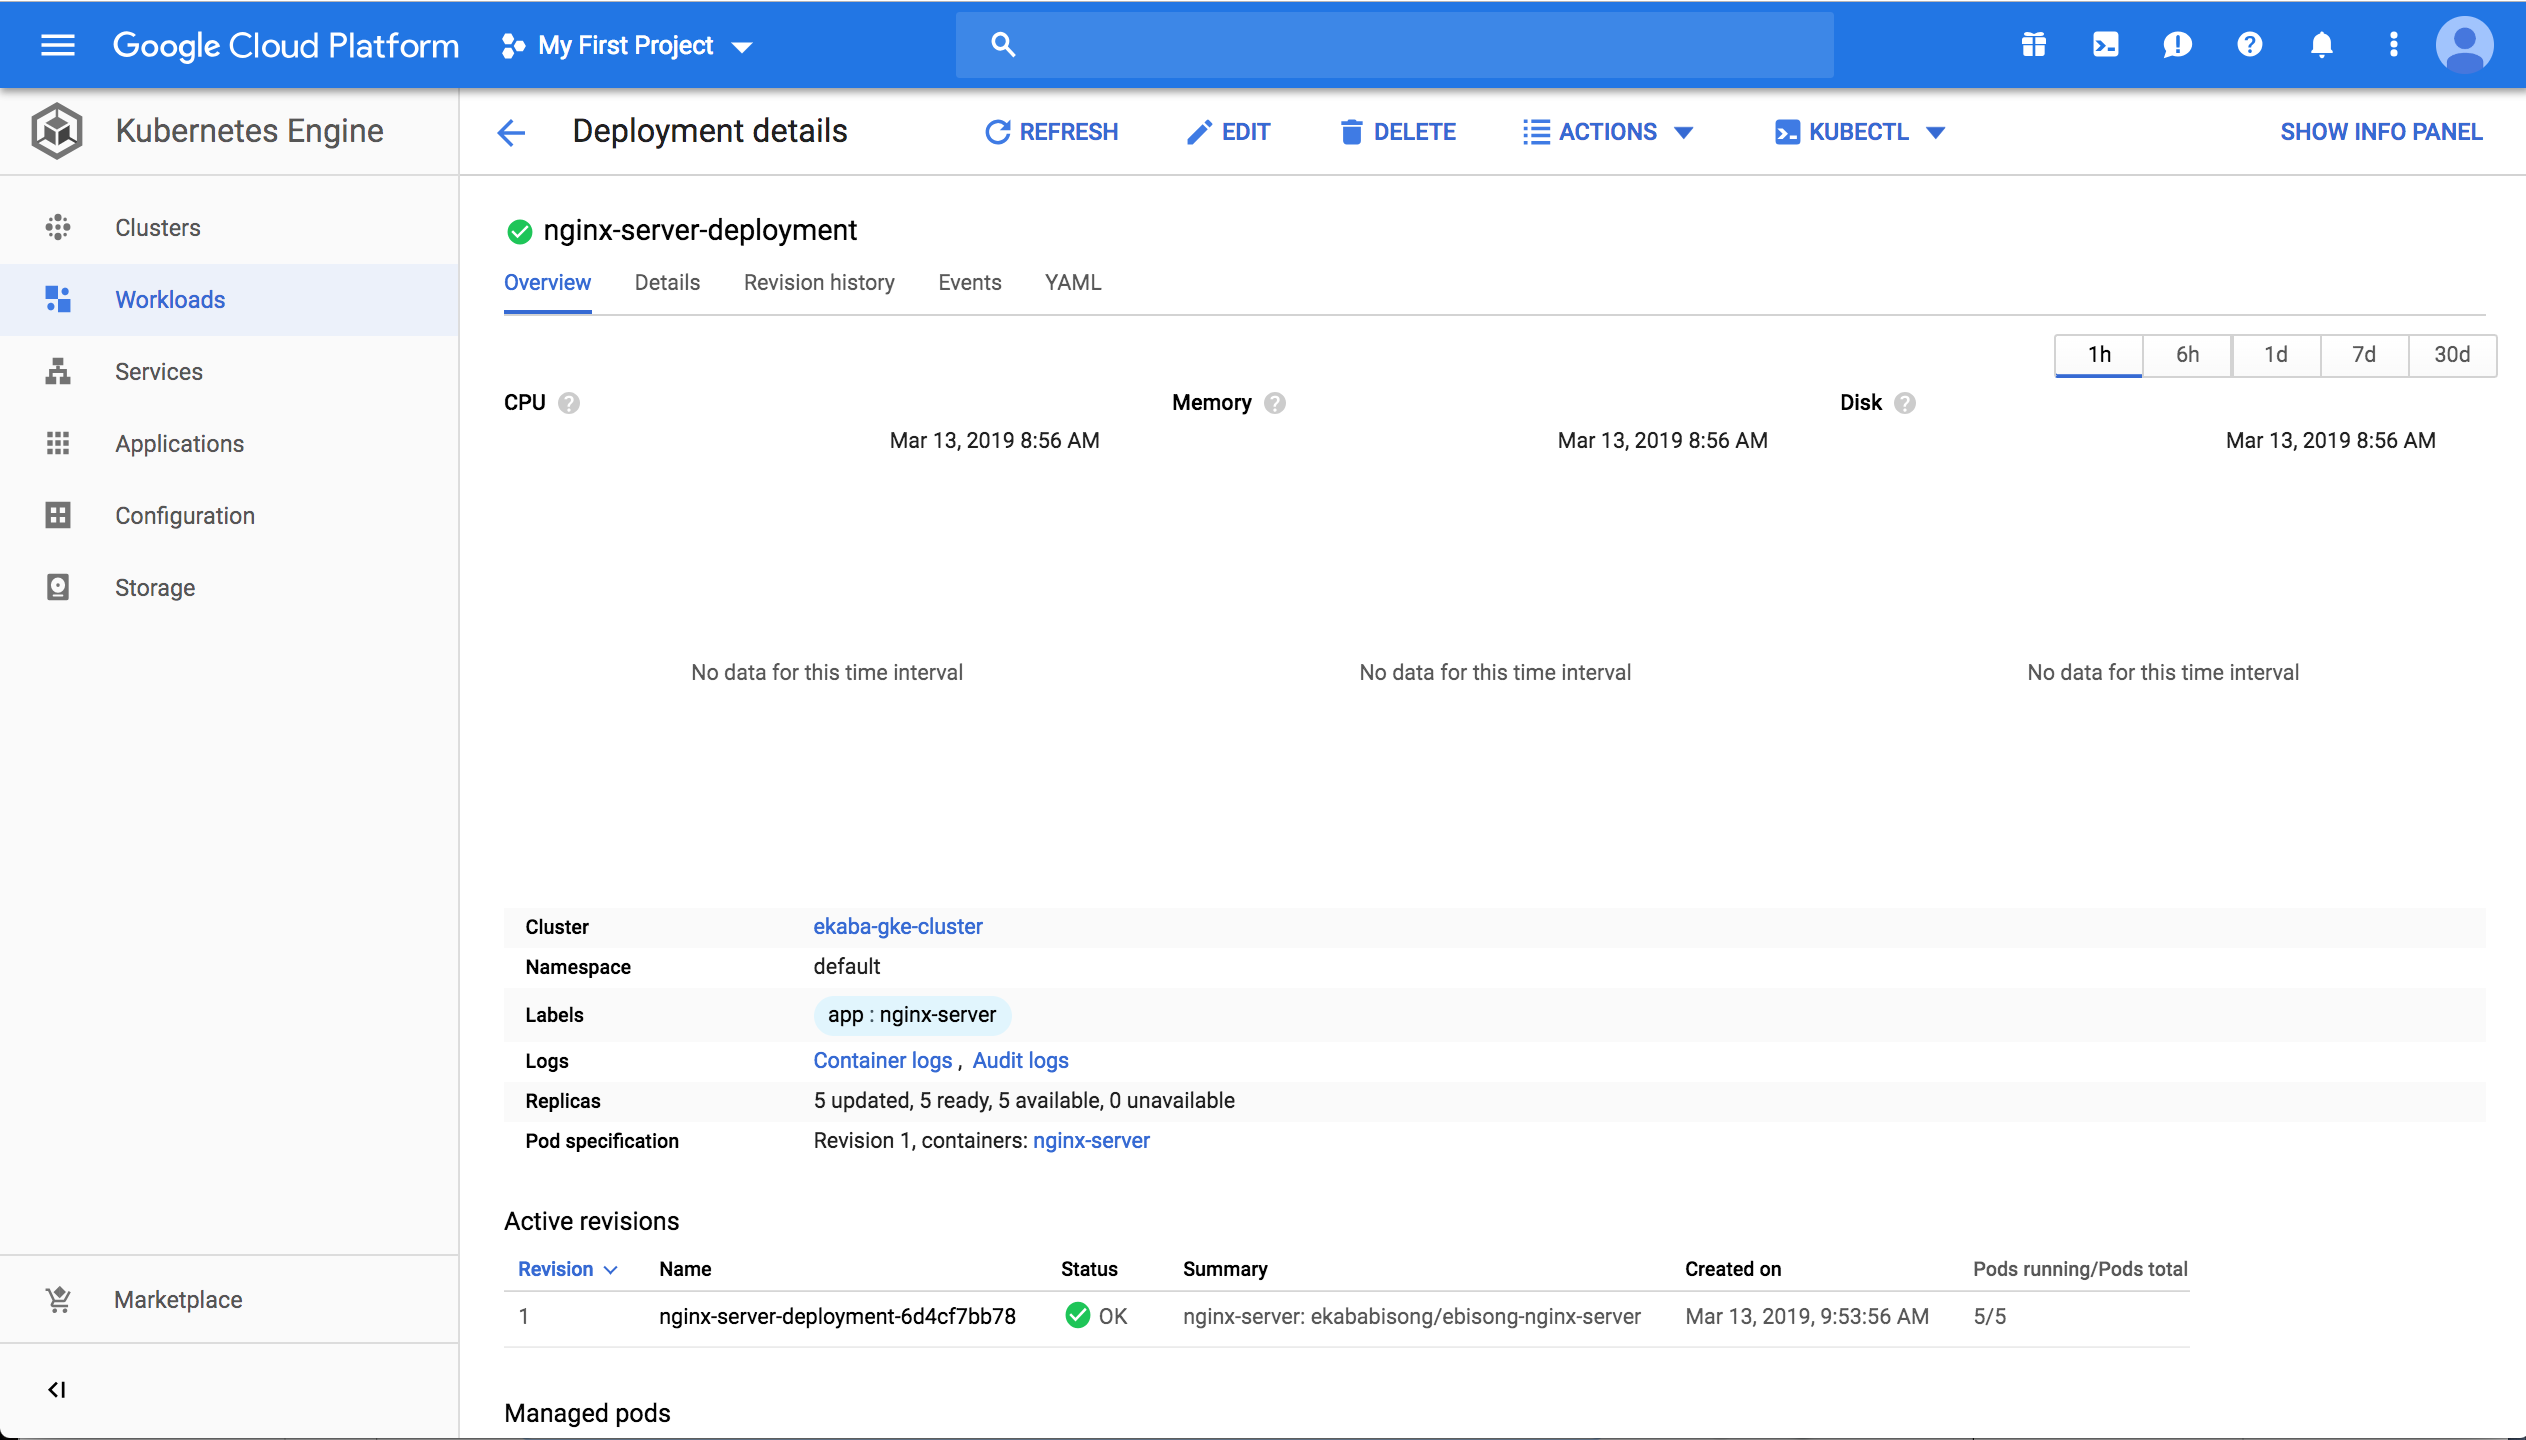
The deployment details can be seen on the GCP Kubernetes Engine console:
Workloads on Kubernetes Engine console
Deployment details on GKE console
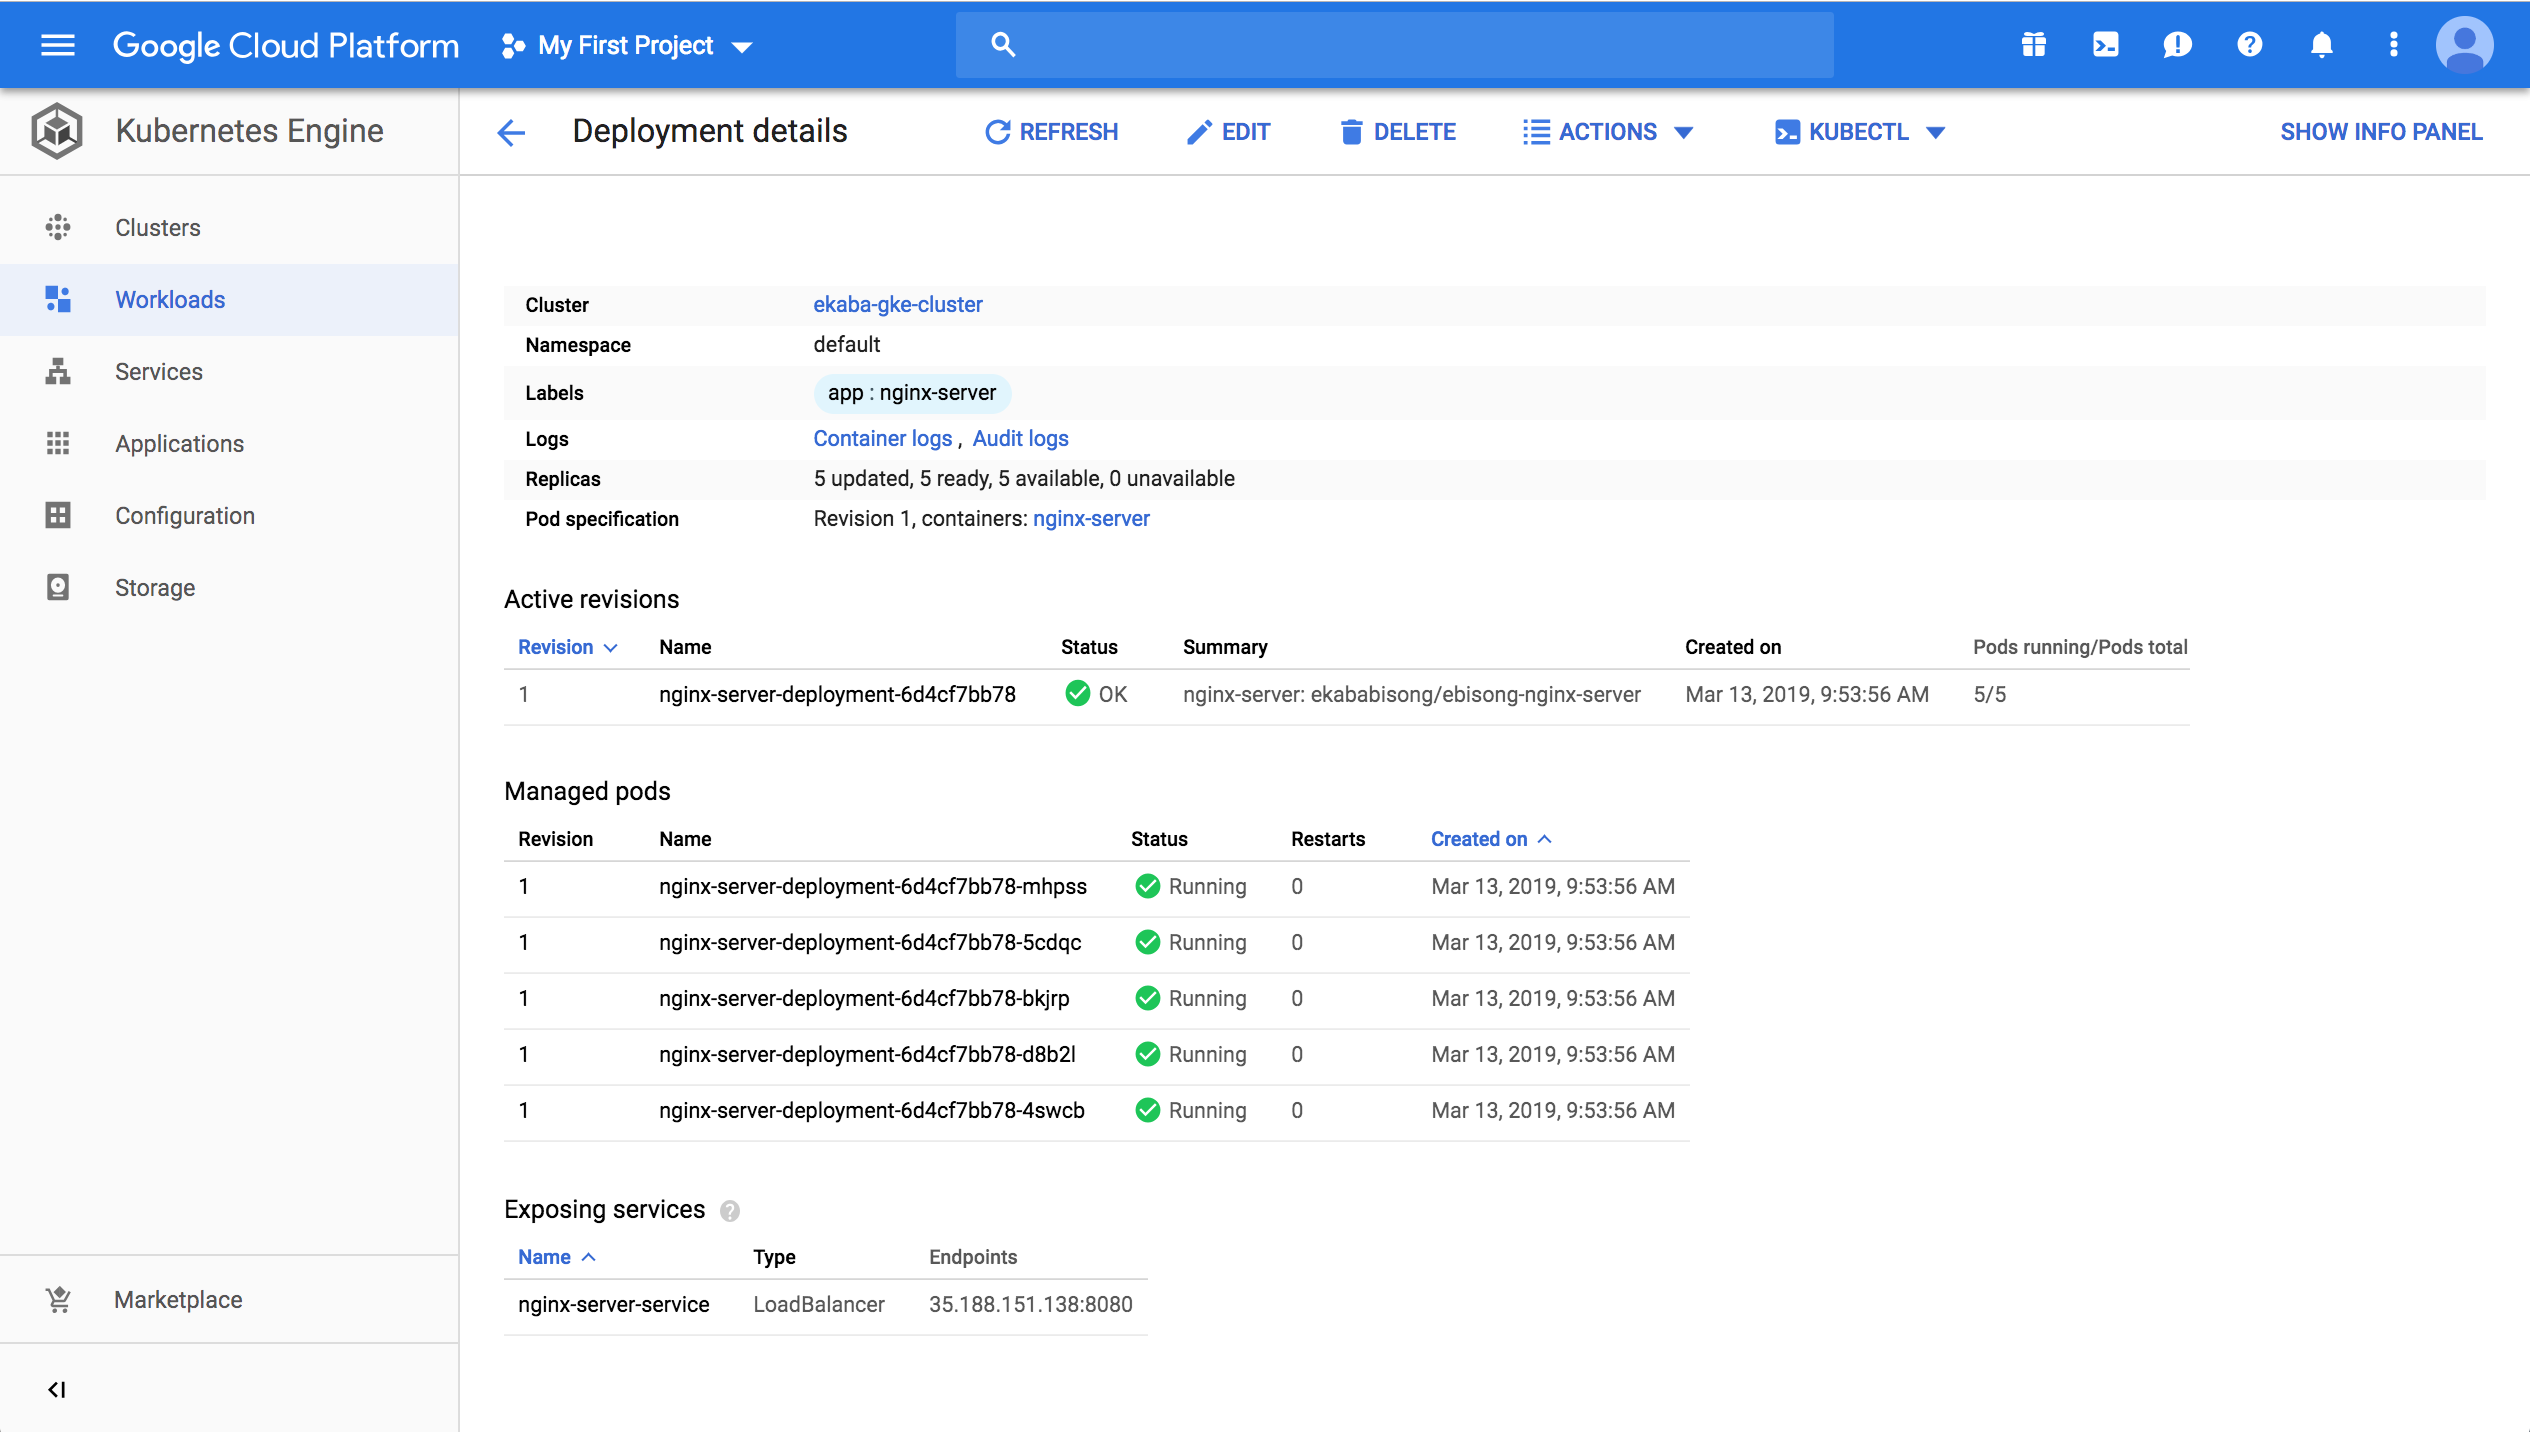
List pods
bash# list pods kubectl get pods
textNAME READY STATUS RESTARTS AGE nginx-server-deployment-6d4cf7bb78-4swcb 1/1 Running 0 41m nginx-server-deployment-6d4cf7bb78-5cdqc 1/1 Running 0 41m nginx-server-deployment-6d4cf7bb78-bkjrp 1/1 Running 0 41m nginx-server-deployment-6d4cf7bb78-d8b2l 1/1 Running 0 41m nginx-server-deployment-6d4cf7bb78-mhpss 1/1 Running 0 41m
Get External IP of Pod Deployment on GKE
bash# get kubernetes service kubectl get service
textNAME TYPE CLUSTER-IP EXTERNAL-IP PORT(S) AGE kubernetes ClusterIP 10.23.240.1 <none> 443/TCP 1h nginx-server-service LoadBalancer 10.23.248.194 35.188.151.138 8080:30001/TCP 57m
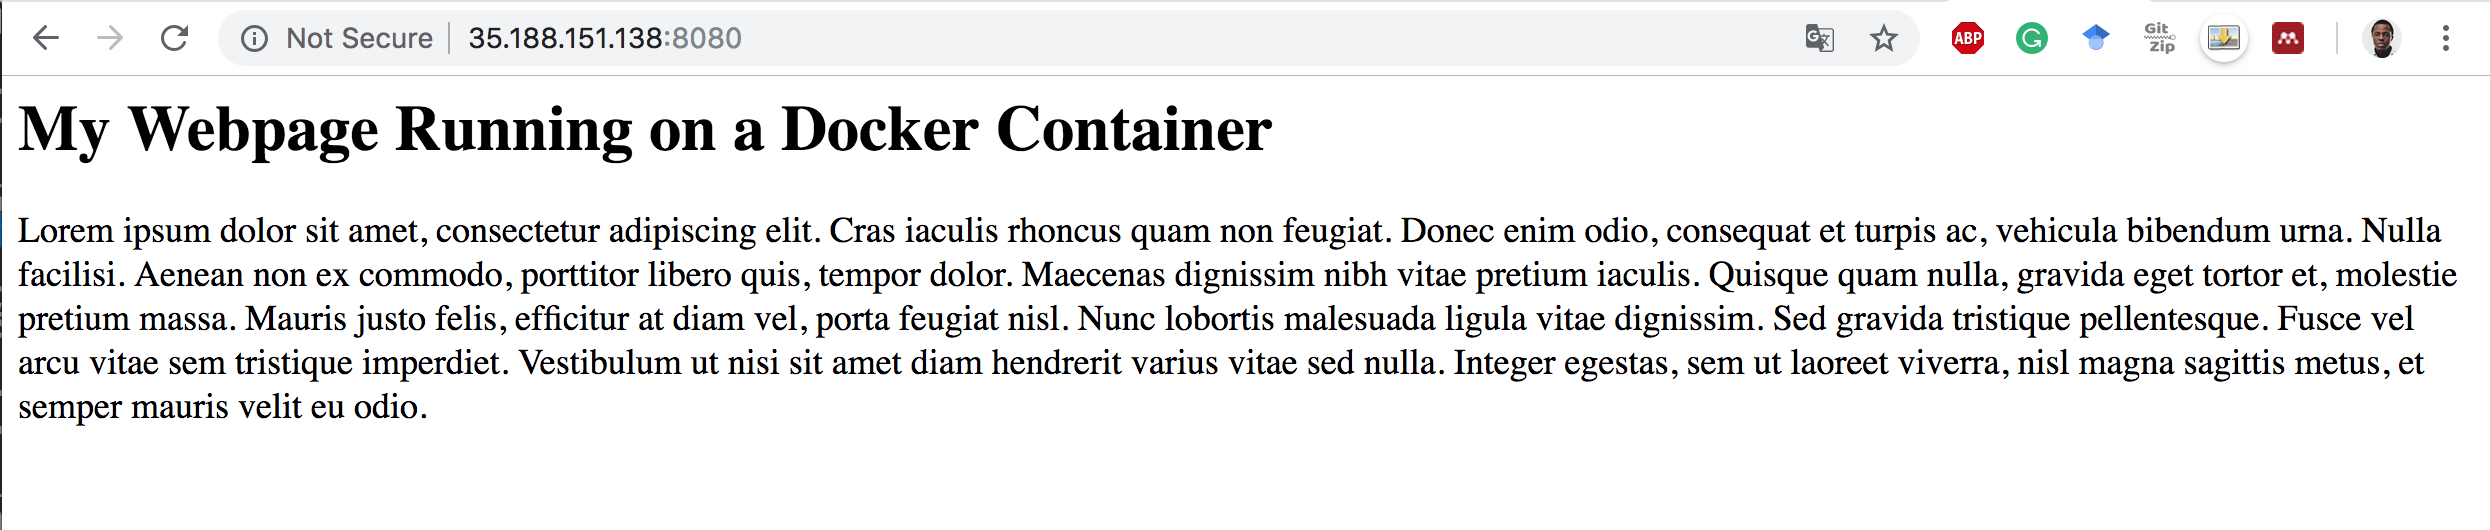
Application Running on GKE
Access the deployed application on GKE by running 35.188.151.138:8080.
Delete the Deployment on GKE
bash# delete the deployment kubectl delete -f deployment.yaml
textservice "nginx-server-service" deleted deployment.extensions "nginx-server-deployment" deleted
Delete the Kubernetes Cluster on GKE
bash# delete the kubernetes cluster gcloud container clusters delete ekaba-gke-cluster
textThe following clusters will be deleted. - [ekaba-gke-cluster] in [us-central1-a] Do you want to continue (Y/n)? Y Deleting cluster ekaba-gke-cluster...done. Deleted [https://container.googleapis.com/v1/projects/oceanic-sky-230504/zones/us-central1-a/clusters/ekaba-gke-cluster].